

1. Create and configure the app
OA1–OA5: create a Feishu or Lark enterprise custom app, enter its credentials, batch-enable permissions, and configure the message event and card callback.
This page covers OA1 → OA5. First read Before you start and confirm whether you use Feishu or Lark.
OA1. Open setup in DataScaler
- Open your VOC brand report and select Configure now in the OA integration banner near the top.
- Select Feishu or Lark, then select Next to continue to Connect.
- Select the small Configure my enterprise app link below the assistance-request button.
Ready to continue: The My Feishu / Lark self-built app dialog is open. Leave it open while you create the app.
Cannot find the link? Show screenshot
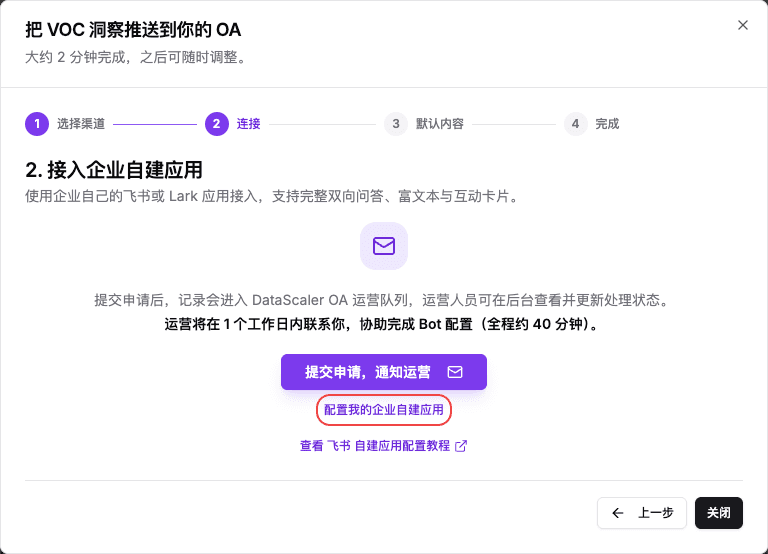
Submit request / notify operations requests human assistance; it does not open the form. You do not need to submit a request for self-service setup.
OA2. Create an app and add a bot
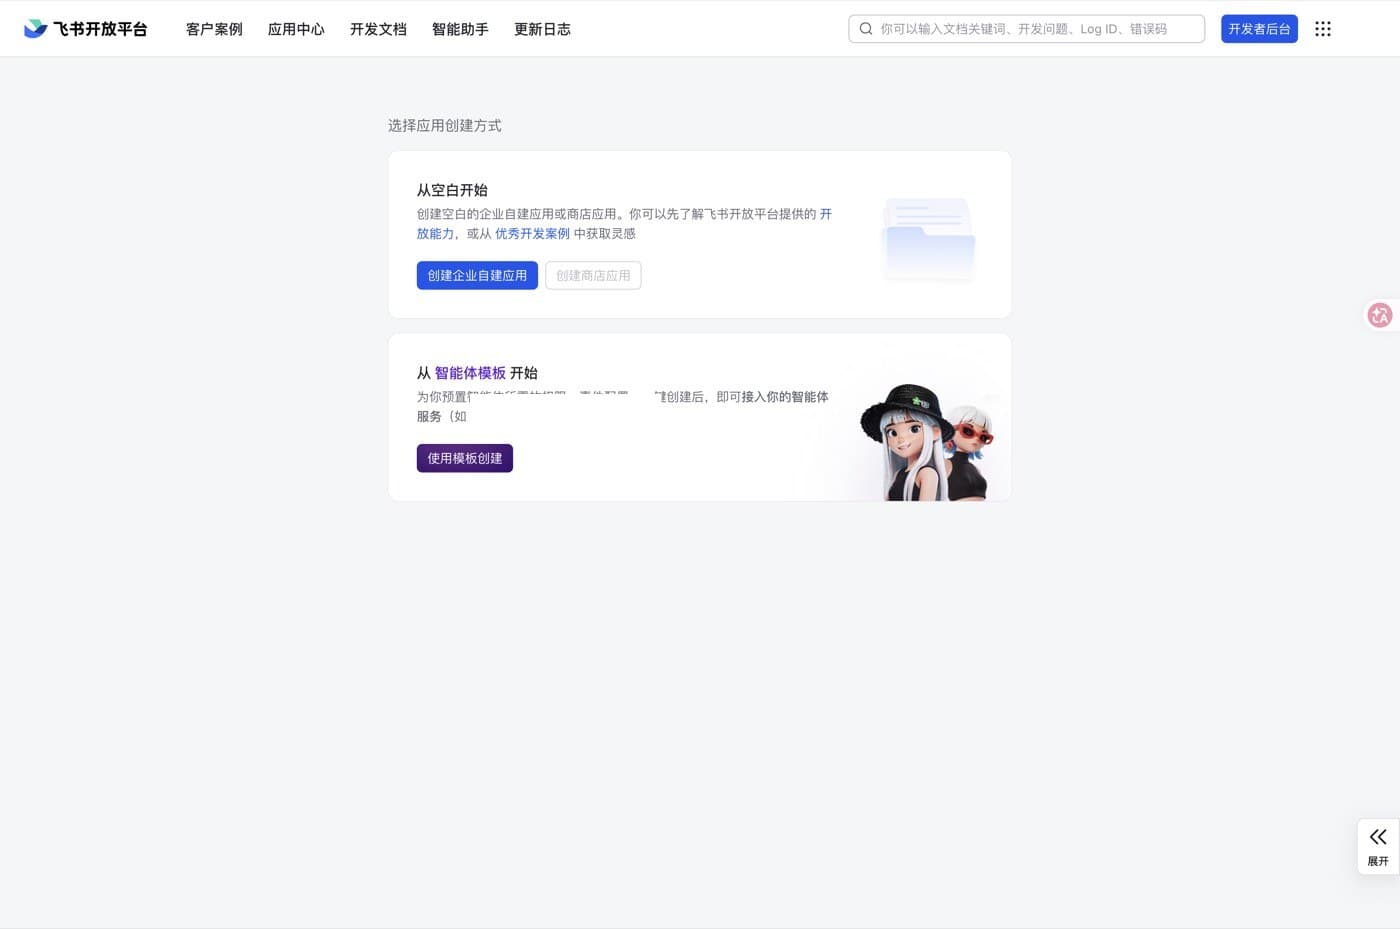
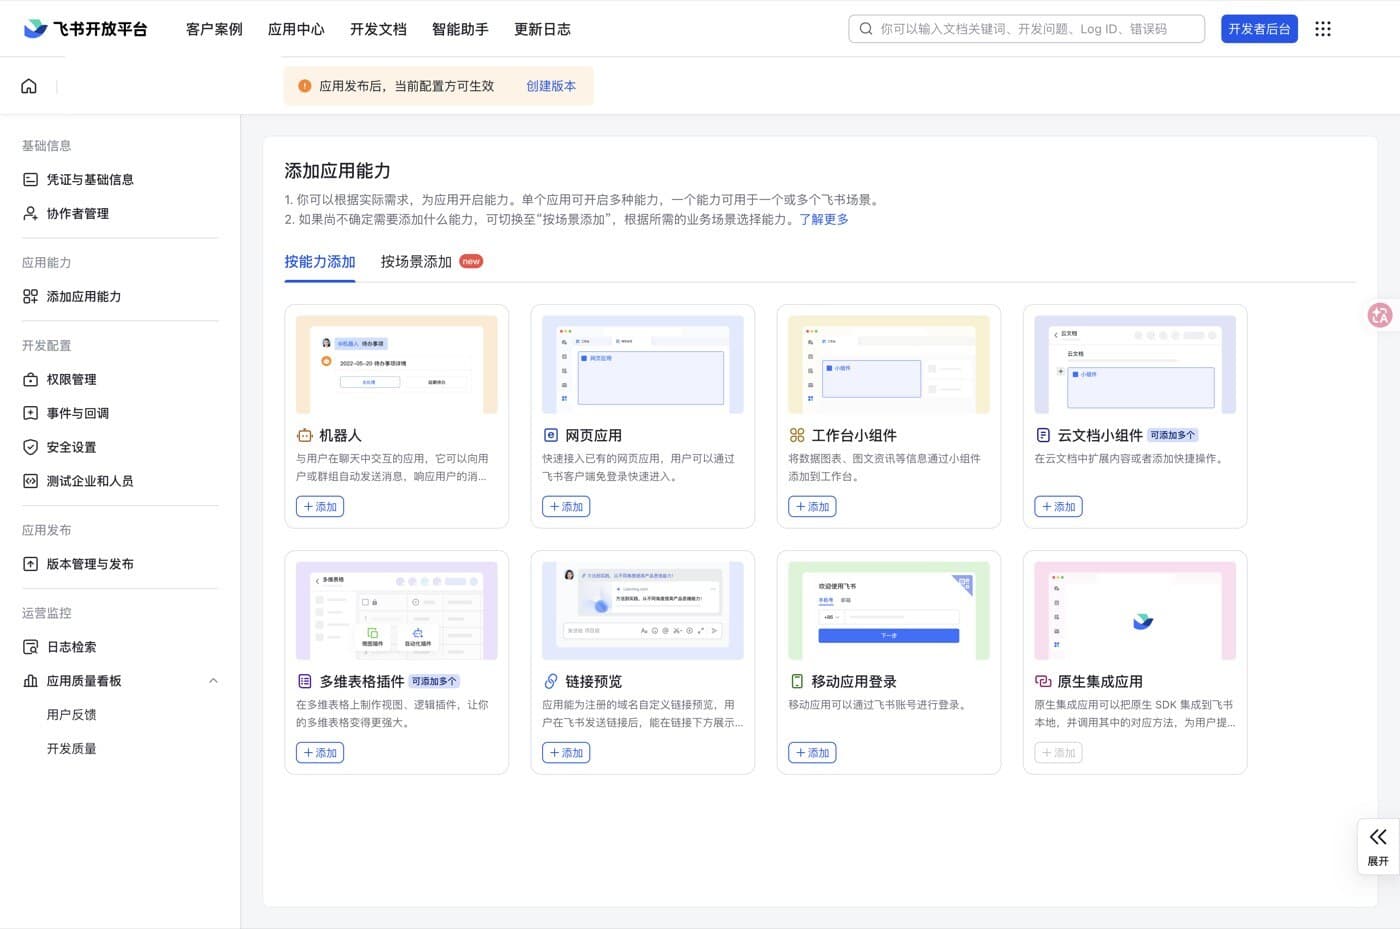
Feishu: In the Feishu developer console, select 创建企业自建应用 (create a custom app); some versions first offer “start from scratch”. Enter a name, description and icon. Add 机器人 (Bot) under 添加应用能力 (add app capabilities).
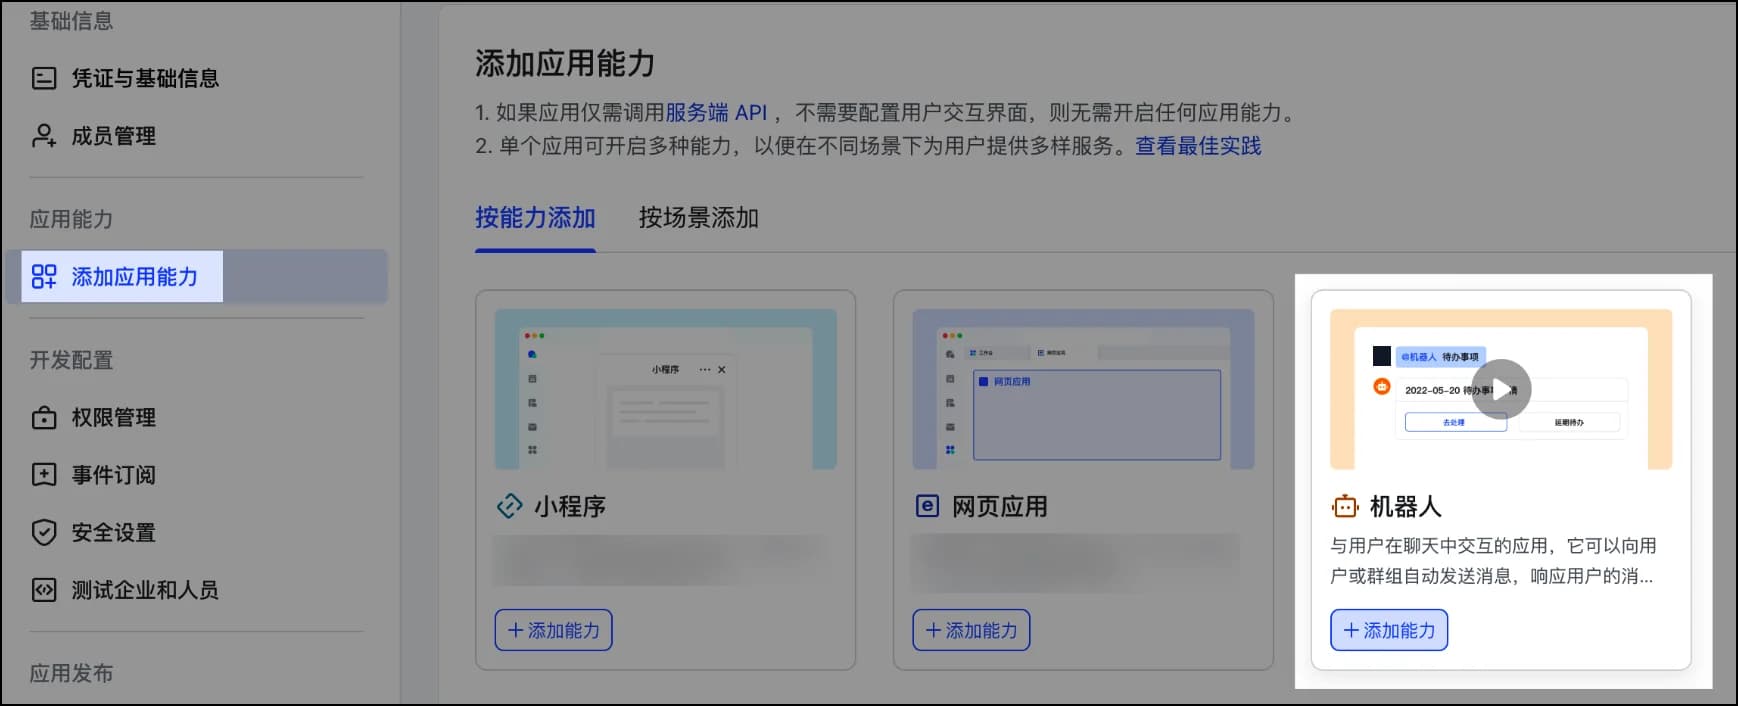
Lark: In the Lark Developer Console, select Create Custom App, then enter a name, description and icon. Add Bot under App Features / Add Features.
For example, name it “Brand Insights Assistant” and describe it as “Receive brand insights and ask questions”. Remember the name so you can find the bot later.
Feishu: app creation and Bot screenshots
Lark: Bot screenshot
Ready to continue: The app exists and Bot capability is added.
OA3. Copy app details and generate two URLs
Copy these values from the developer console into the DataScaler dialog from OA1. You do not need to understand the technical details or invent values.
| DataScaler field | Feishu location | Lark location |
|---|---|---|
| App ID | 凭证与基础信息 | Credentials & Basic Info |
| App Secret | 凭证与基础信息 | Credentials & Basic Info |
| Verification Token | 事件与回调 → 加密策略 / 安全配置 | Events & Callbacks → Encryption Strategy / security settings |
Encrypt Key: Copy it from the same app only if callback encryption is enabled; otherwise leave it blank. Tenant ID: Normally leave blank. Do not enter the App ID here.
Select Save and generate callback URLs. Keep both URLs for OA5: Event Webhook receives messages, and Card Interaction Webhook handles card buttons.
Show the DataScaler form
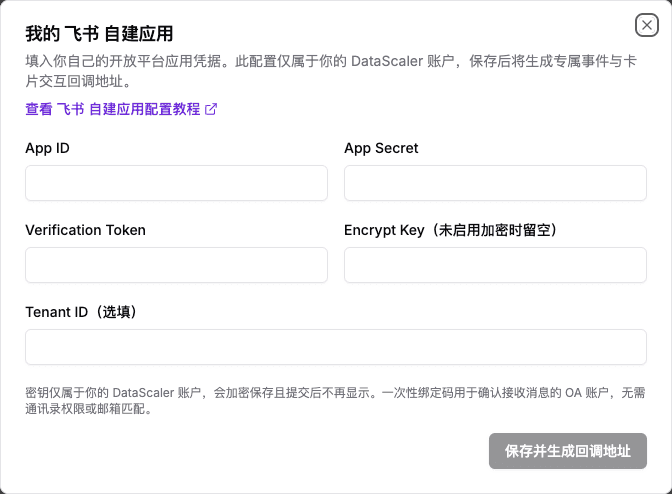
Ready to continue: Two dedicated URLs appear. Saved secrets are not displayed again; empty fields do not mean you need to re-enter them.
App Secret, Verification Token and Encrypt Key are sensitive. Enter them only in the relevant configuration pages. Never publicly share secrets, dedicated URLs or active binding codes.
OA4. Batch-enable bot permissions
Feishu and Lark use identical scope codes, so import the same JSON on either platform. Open Permissions & Scopes, select the batch-import option, or search the codes in the tenant array one by one if your console has no import action.
All permissions use App identity / tenant_access_token. Keep user as an empty array.
Copy this JSON (Feishu and Lark)
{
  "scopes": {
    "tenant": [
      "application:application:self_manage",
      "application:bot.menu:write",
      "contact:user.basic_profile:readonly",
      "contact:user.employee_id:readonly",
      "docs:permission.member:create",
      "docs:permission.member:transfer",
      "docs:permission.setting:write_only",
      "docx:document",
      "docx:document.block:convert",
      "drive:drive.metadata:readonly",
      "im:app_feed_card:write",
      "im:chat.members:read",
      "im:chat:readonly",
      "im:message.group_at_msg:readonly",
      "im:message.p2p_msg:readonly",
      "im:message.reactions:write_only",
      "im:message:send_as_bot",
      "im:message:send_multi_users",
      "im:message:update",
      "im:resource"
    ],
    "user": []
  }
}| Scopes | Used for |
|---|---|
im:message:send_as_bot, im:message:send_multi_users, im:message:update, im:resource | Sending, batch-delivering and updating bot messages and cards, and sending images and other resources |
im:message.p2p_msg:readonly, im:message.group_at_msg:readonly | Receiving direct messages and group messages that @mention the bot |
im:message.reactions:write_only | Adding a processing reaction to a message |
im:chat:readonly, im:chat.members:read | Reading group names and members for group delivery and access checks |
im:app_feed_card:write | Delivering app feed cards |
contact:user.basic_profile:readonly, contact:user.employee_id:readonly | Identifying who asks and who clicks a card button. Without the latter, card actions may not produce a usable callback |
docx:document, docx:document.block:convert, drive:drive.metadata:readonly | Turning a conversation into an online document |
docs:permission.member:create, docs:permission.member:transfer, docs:permission.setting:write_only | Setting link sharing, adding collaborators and transferring ownership of generated documents |
application:application:self_manage, application:bot.menu:write | Reading the app configuration and writing the bot shortcut menu |
Ready to continue: The import succeeds and every scope appears under app identity permissions. Permission changes still require the OA6 release and administrator approval.
OA5. Configure the message event and card callback
A callback URL tells the platform where to send information to DataScaler. Copy the supplied URLs; you do not need to host a server.
Feishu: 事件与回调. Lark: Events & Callbacks.
A. Message event: receive your messages
- Open Event Configuration / 事件配置.
- Choose Send events to the developer server using a Request URL, not persistent connection or WebSocket.
- Copy Event Webhook from DataScaler (ending in
/events), paste it into Request URL, save and wait for successful validation. - Select Add Events / 添加事件. Search for Receive message, or 接收消息 in Chinese.
- Select the result with identifier
im.message.receive_v1and confirm. - To use Quick menu setup, add the Bot custom menu event with identifier
application.bot.menu_v6. The event itself requires no additional scope. DataScaler can submit the Feishu menu automatically; configure Lark manually below.
Check: The event list contains im.message.receive_v1; when bot menus are used, it also contains application.bot.menu_v6. Saving the URL alone is not enough.
B. Card callback: make card buttons work
- Open Callback Configuration / 回调配置 and choose the developer-server option.
- Copy Card Interaction Webhook from DataScaler (ending in
/interactions), paste it into Request URL, save and wait for successful validation. - Select Add Callbacks / 添加回调. Search for Card, or 卡片回传交互 in Chinese, and check the identifier.
- Select
card.action.triggerand confirm. Do not choose the legacycard.action.trigger_v1callback. Also confirm that OA4 includes Get user ID (contact:user.employee_id:readonly) so card-button clicks can be attributed to the operator.
Ready to continue: Both URLs validate successfully, and both the message event and card callback are added. Do not swap the URLs.
C. Configure the Lark shortcut menu manually
Feishu users can select Quick menu setup in the DataScaler OA management panel to submit the menu automatically. For Lark, the same button opens this section; configure the menu in the developer console.
- In Lark Developer Console, open the app and go to Bot → Bot Menu / Custom Menu.
- Create three menu items with content type Event. The names and
event_keyvalues must match this table:
| Menu name | Chinese name | event_key |
|---|---|---|
| New session | 新会话 | datascaler.new_session |
| History | 历史会话 | datascaler.history |
| My subscriptions | 我的订阅 | datascaler.my_subscriptions |
- Return to Events & Callbacks → Event Configuration and confirm the Bot custom menu event
application.bot.menu_v6is subscribed. - Save the menu, then continue to OA6: create a new version, submit it for administrator review and wait for release.
Ready to continue: All three menu items use event content, the event_key values match exactly, and the event list contains application.bot.menu_v6.
Next step
Once the app is configured, continue to Step 2: Publish and bind your account.
Before you start
Connect DataScaler to your company's own Feishu or Lark custom app, or WeCom smart bot, to receive brand insights and ask questions in a bot direct message. Check the prerequisites and your platform first.
2. Publish and bind your account
OA6–OA8: publish the enterprise custom app and wait for administrator approval, bind your Feishu or Lark account in DataScaler, and check Q&A and delivery settings.